> ## Documentation Index
> Fetch the complete documentation index at: https://docs.rafftechnologies.com/llms.txt
> Use this file to discover all available pages before exploring further.
# Manage a VPC
> Open the VPC detail page to rename, change DNS, enable an internet gateway (Platform Router or Firewall Appliance), attach VMs, and configure port forwarding
Updated May 8, 2026
Every VPC has a **detail page** that puts everything you can do to it in one screen — rename, change DNS, choose an internet gateway, attach or detach VMs, configure port forwarding. This page is the one you open from the row menu's **Manage VPC** action or by clicking the VPC name in the list.
## Open the detail page
In **Networking → VPCs**, find the VPC and click its `⋮` menu → **Manage VPC**.
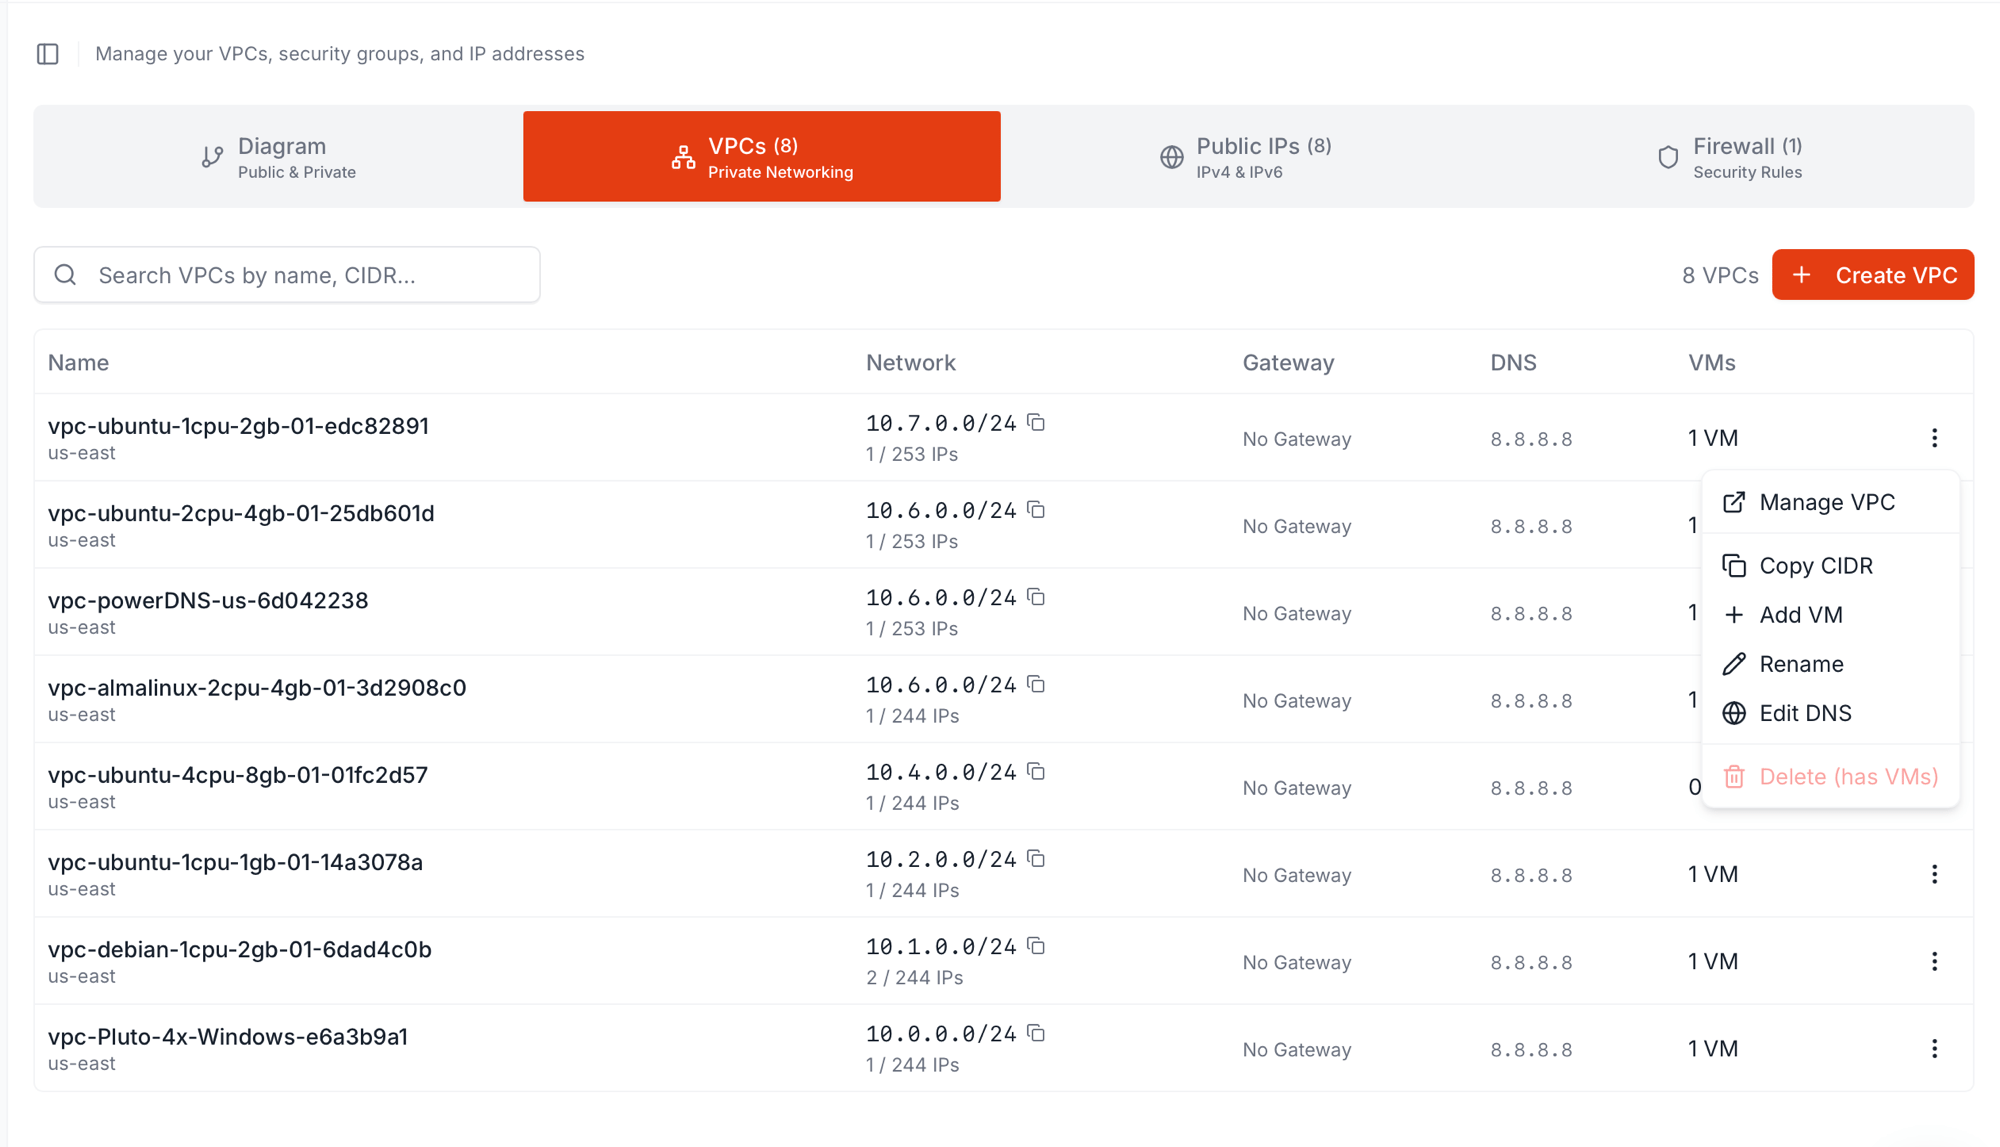 The row menu also has shortcuts that bypass the detail page — **Copy CIDR**, **Add VM**, **Rename**, **Edit DNS**, **Delete**. The detail page is when you want to see and change multiple things at once, or when you need access to **Internet Gateway**, **Port Fwd**, **Peering**, or **Services** — those only live on the detail page.
## What the detail page shows
The row menu also has shortcuts that bypass the detail page — **Copy CIDR**, **Add VM**, **Rename**, **Edit DNS**, **Delete**. The detail page is when you want to see and change multiple things at once, or when you need access to **Internet Gateway**, **Port Fwd**, **Peering**, or **Services** — those only live on the detail page.
## What the detail page shows
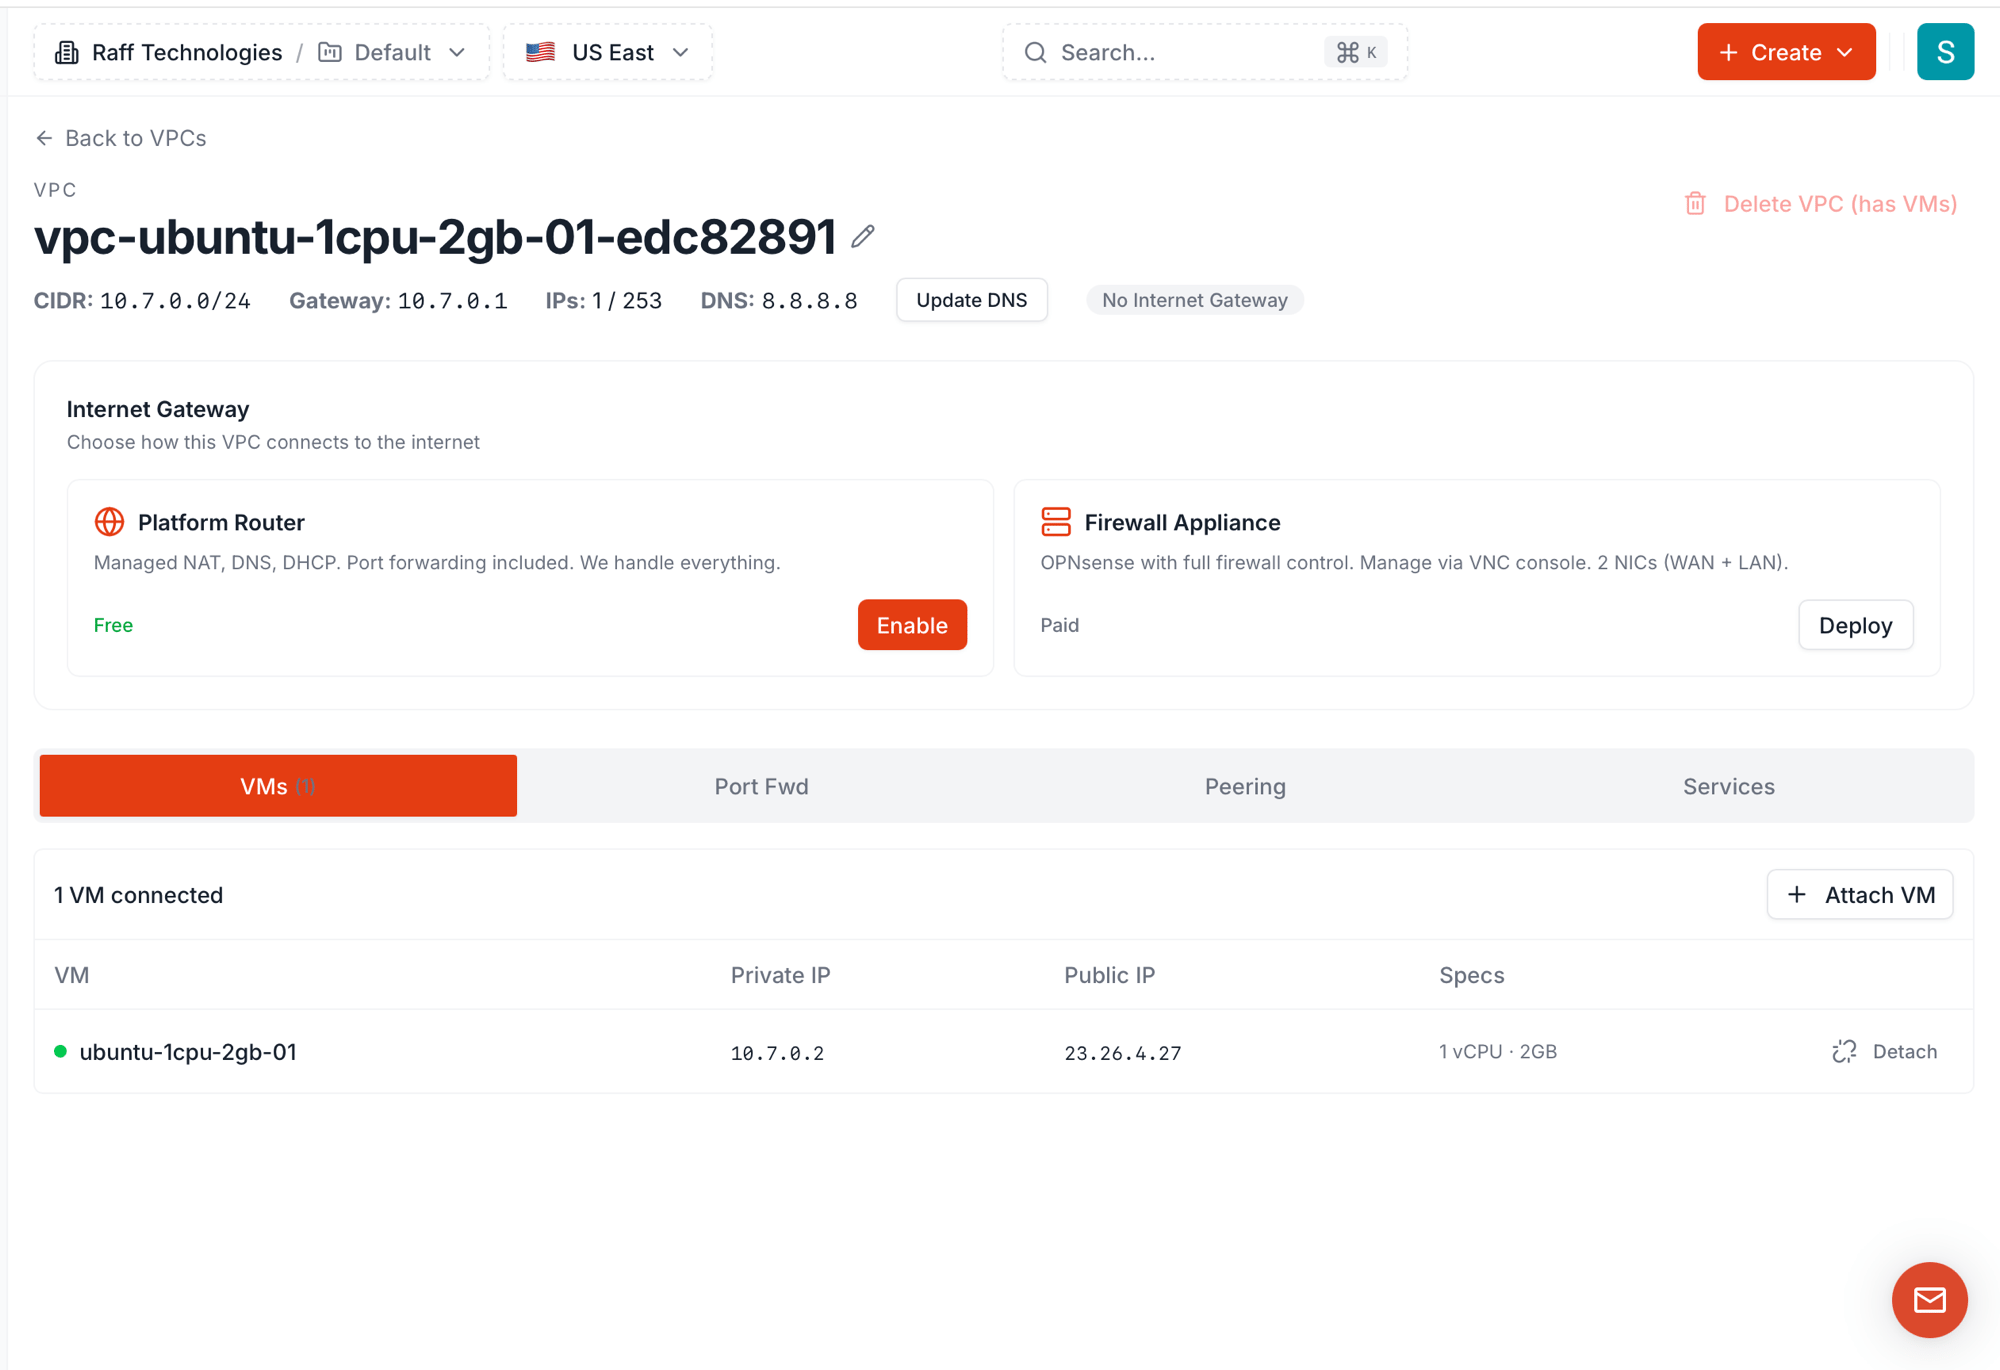 The page has four logical zones, top to bottom:
1. **Header** — VPC name (with inline rename pencil), `Delete VPC` action on the right (disabled while VMs are attached)
2. **Stats row** — CIDR, gateway IP, IPs in use vs available, DNS, **Update DNS** button, and an Internet Gateway badge (`No Internet Gateway` until you enable one)
3. **Internet Gateway** picker — two cards, **Platform Router** and **Firewall Appliance**
4. **Tabs** — **VMs** (live), **Port Fwd** (live), **Peering** (coming soon), **Services** (coming soon)
## Rename a VPC
Click the **pencil icon** next to the VPC name in the header. The name becomes editable; type a new label and confirm. The CIDR and VXLAN VNI don't change — only the display label.
You can also rename from the row menu in the list view; both go through the same update.
## Change DNS
The default resolver for VPC members is **`8.8.8.8`** (Google Public DNS). Change it from the stats row's **Update DNS** button or from the row menu's **Edit DNS** action — both open the same dialog.
The page has four logical zones, top to bottom:
1. **Header** — VPC name (with inline rename pencil), `Delete VPC` action on the right (disabled while VMs are attached)
2. **Stats row** — CIDR, gateway IP, IPs in use vs available, DNS, **Update DNS** button, and an Internet Gateway badge (`No Internet Gateway` until you enable one)
3. **Internet Gateway** picker — two cards, **Platform Router** and **Firewall Appliance**
4. **Tabs** — **VMs** (live), **Port Fwd** (live), **Peering** (coming soon), **Services** (coming soon)
## Rename a VPC
Click the **pencil icon** next to the VPC name in the header. The name becomes editable; type a new label and confirm. The CIDR and VXLAN VNI don't change — only the display label.
You can also rename from the row menu in the list view; both go through the same update.
## Change DNS
The default resolver for VPC members is **`8.8.8.8`** (Google Public DNS). Change it from the stats row's **Update DNS** button or from the row menu's **Edit DNS** action — both open the same dialog.
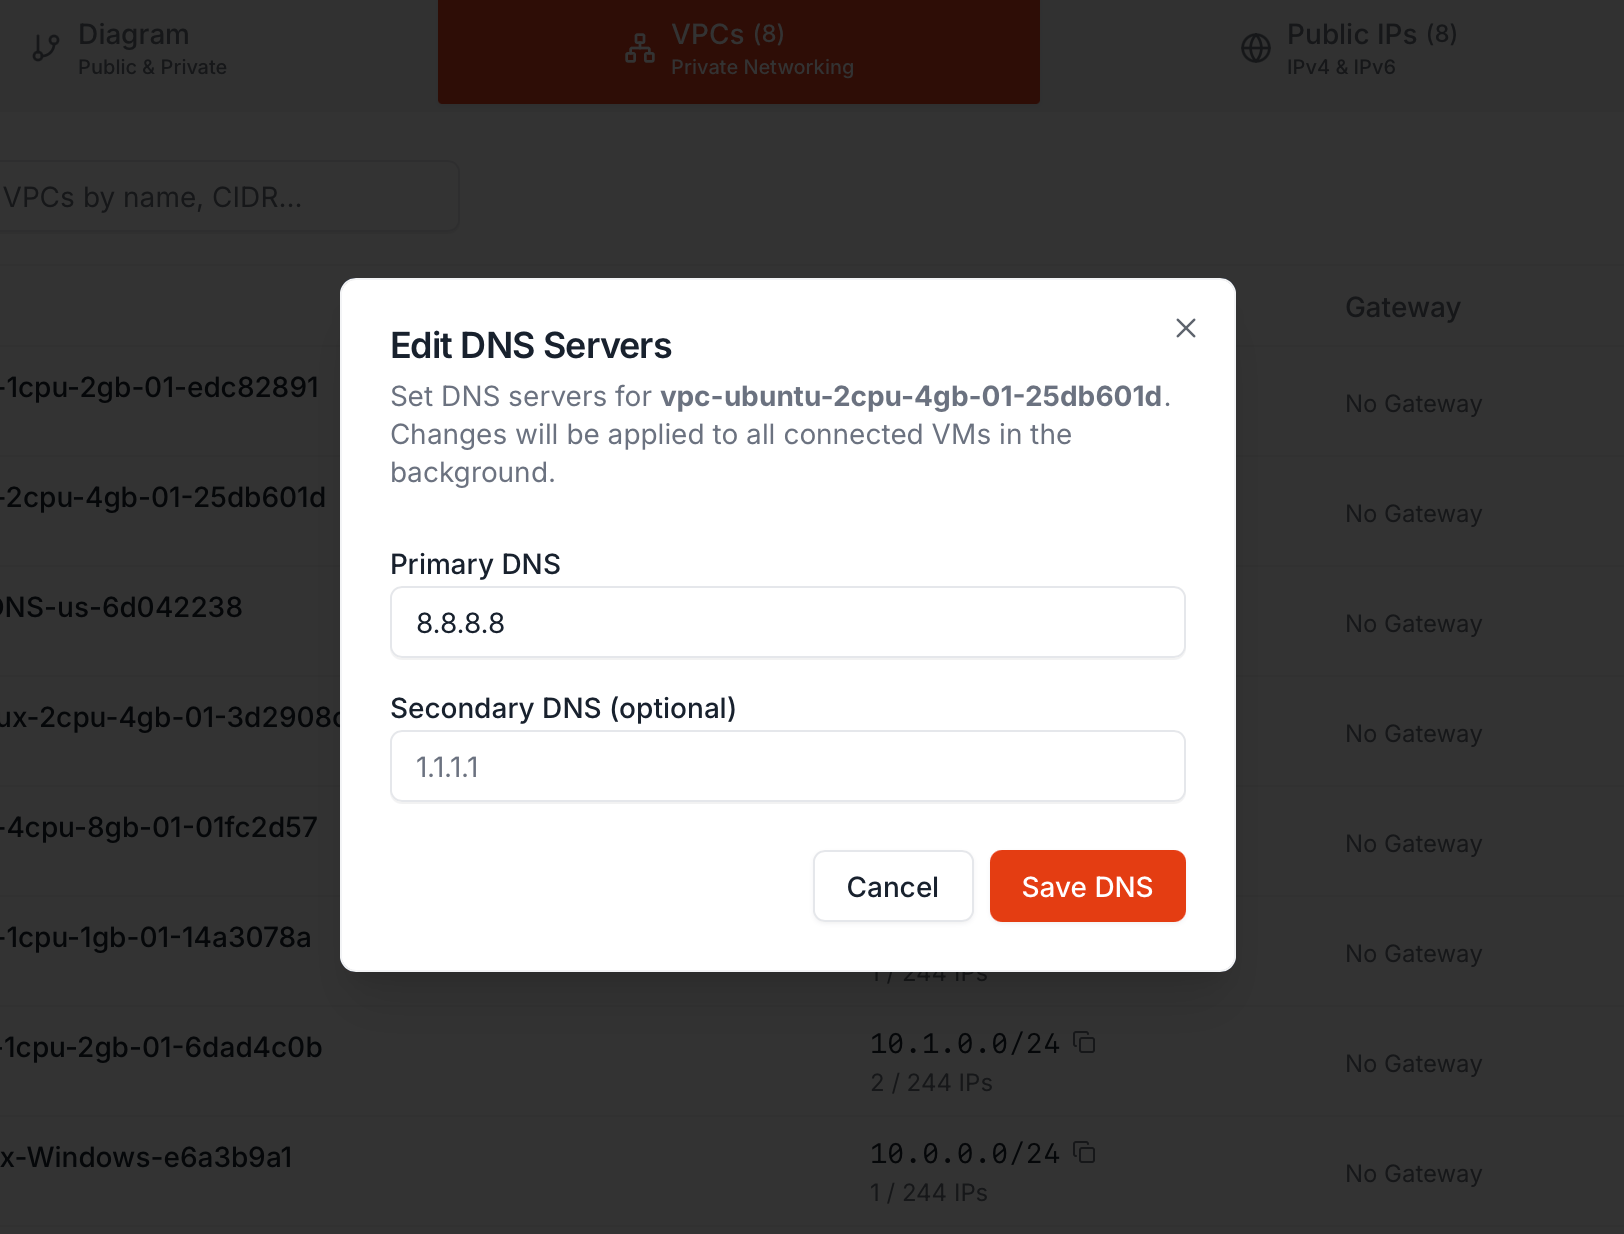 Two fields:
| Field | Required? | What goes here |
| ---------------------------- | --------- | -------------------------------------------------------------------------------------------------------------------------------------------------------------------------------------------------------- |
| **Primary DNS** | Yes | The first resolver your VMs hit. Default `8.8.8.8`; common alternatives are `1.1.1.1` (Cloudflare), `9.9.9.9` (Quad9), or the IP of an internal resolver running inside the VPC (e.g. PowerDNS, CoreDNS) |
| **Secondary DNS (optional)** | No | Failover resolver — used by the guest's DNS stack if the primary doesn't answer. Leave blank if you don't need a fallback |
Both addresses must be reachable from VMs in this VPC. If you set an internal resolver as primary, make sure that VM is up and listening before saving — VMs in the VPC will start using the new resolver as soon as they renew their DHCP lease.
Click **Save DNS** to apply. The dialog notes "*Changes will be applied to all connected VMs in the background*" — that's exactly what happens. New VMs joining the VPC pick up the new values from DHCP at boot; existing VMs apply them on lease renewal (typically minutes to a few hours, depending on your image's DHCP client). To force it immediately inside a guest:
* **Linux** — `dhclient -r && dhclient` or `systemctl restart systemd-networkd`
* **Windows** — `ipconfig /renew` from an elevated prompt
Or just reboot the VM.
## Internet Gateway — Platform Router vs Firewall Appliance
By default a VPC has **no internet gateway** — the badge in the stats row says `No Internet Gateway` and VMs reach the internet only if they have their own Public IP attached. To give VMs in the VPC outbound internet access **without** assigning each one a Public IP, enable an internet gateway. Two mutually exclusive choices per VPC, picked once and switchable later:
| Gateway | Cost | What it is | When to pick it |
| ---------------------- | -------------------------- | ---------------------------------------------------------------- | ----------------------------------------------------------------------------- |
| **Platform Router** | **Free** | Managed gateway VM run by Raff — NAT, DNS, DHCP, port forwarding | Default choice for most VPCs |
| **Firewall Appliance** | **\$4.99/mo or \$9.99/mo** | OPNsense VM you manage yourself, with WAN + LAN NICs | When you need full firewall control, IDS/IPS, custom routing, or built-in VPN |
### Platform Router (free)
Click **Enable** on the Platform Router card. The router VM is provisioned in the background — usually under a minute — and the gateway badge flips to **`Gateway Active`**.
Two fields:
| Field | Required? | What goes here |
| ---------------------------- | --------- | -------------------------------------------------------------------------------------------------------------------------------------------------------------------------------------------------------- |
| **Primary DNS** | Yes | The first resolver your VMs hit. Default `8.8.8.8`; common alternatives are `1.1.1.1` (Cloudflare), `9.9.9.9` (Quad9), or the IP of an internal resolver running inside the VPC (e.g. PowerDNS, CoreDNS) |
| **Secondary DNS (optional)** | No | Failover resolver — used by the guest's DNS stack if the primary doesn't answer. Leave blank if you don't need a fallback |
Both addresses must be reachable from VMs in this VPC. If you set an internal resolver as primary, make sure that VM is up and listening before saving — VMs in the VPC will start using the new resolver as soon as they renew their DHCP lease.
Click **Save DNS** to apply. The dialog notes "*Changes will be applied to all connected VMs in the background*" — that's exactly what happens. New VMs joining the VPC pick up the new values from DHCP at boot; existing VMs apply them on lease renewal (typically minutes to a few hours, depending on your image's DHCP client). To force it immediately inside a guest:
* **Linux** — `dhclient -r && dhclient` or `systemctl restart systemd-networkd`
* **Windows** — `ipconfig /renew` from an elevated prompt
Or just reboot the VM.
## Internet Gateway — Platform Router vs Firewall Appliance
By default a VPC has **no internet gateway** — the badge in the stats row says `No Internet Gateway` and VMs reach the internet only if they have their own Public IP attached. To give VMs in the VPC outbound internet access **without** assigning each one a Public IP, enable an internet gateway. Two mutually exclusive choices per VPC, picked once and switchable later:
| Gateway | Cost | What it is | When to pick it |
| ---------------------- | -------------------------- | ---------------------------------------------------------------- | ----------------------------------------------------------------------------- |
| **Platform Router** | **Free** | Managed gateway VM run by Raff — NAT, DNS, DHCP, port forwarding | Default choice for most VPCs |
| **Firewall Appliance** | **\$4.99/mo or \$9.99/mo** | OPNsense VM you manage yourself, with WAN + LAN NICs | When you need full firewall control, IDS/IPS, custom routing, or built-in VPN |
### Platform Router (free)
Click **Enable** on the Platform Router card. The router VM is provisioned in the background — usually under a minute — and the gateway badge flips to **`Gateway Active`**.
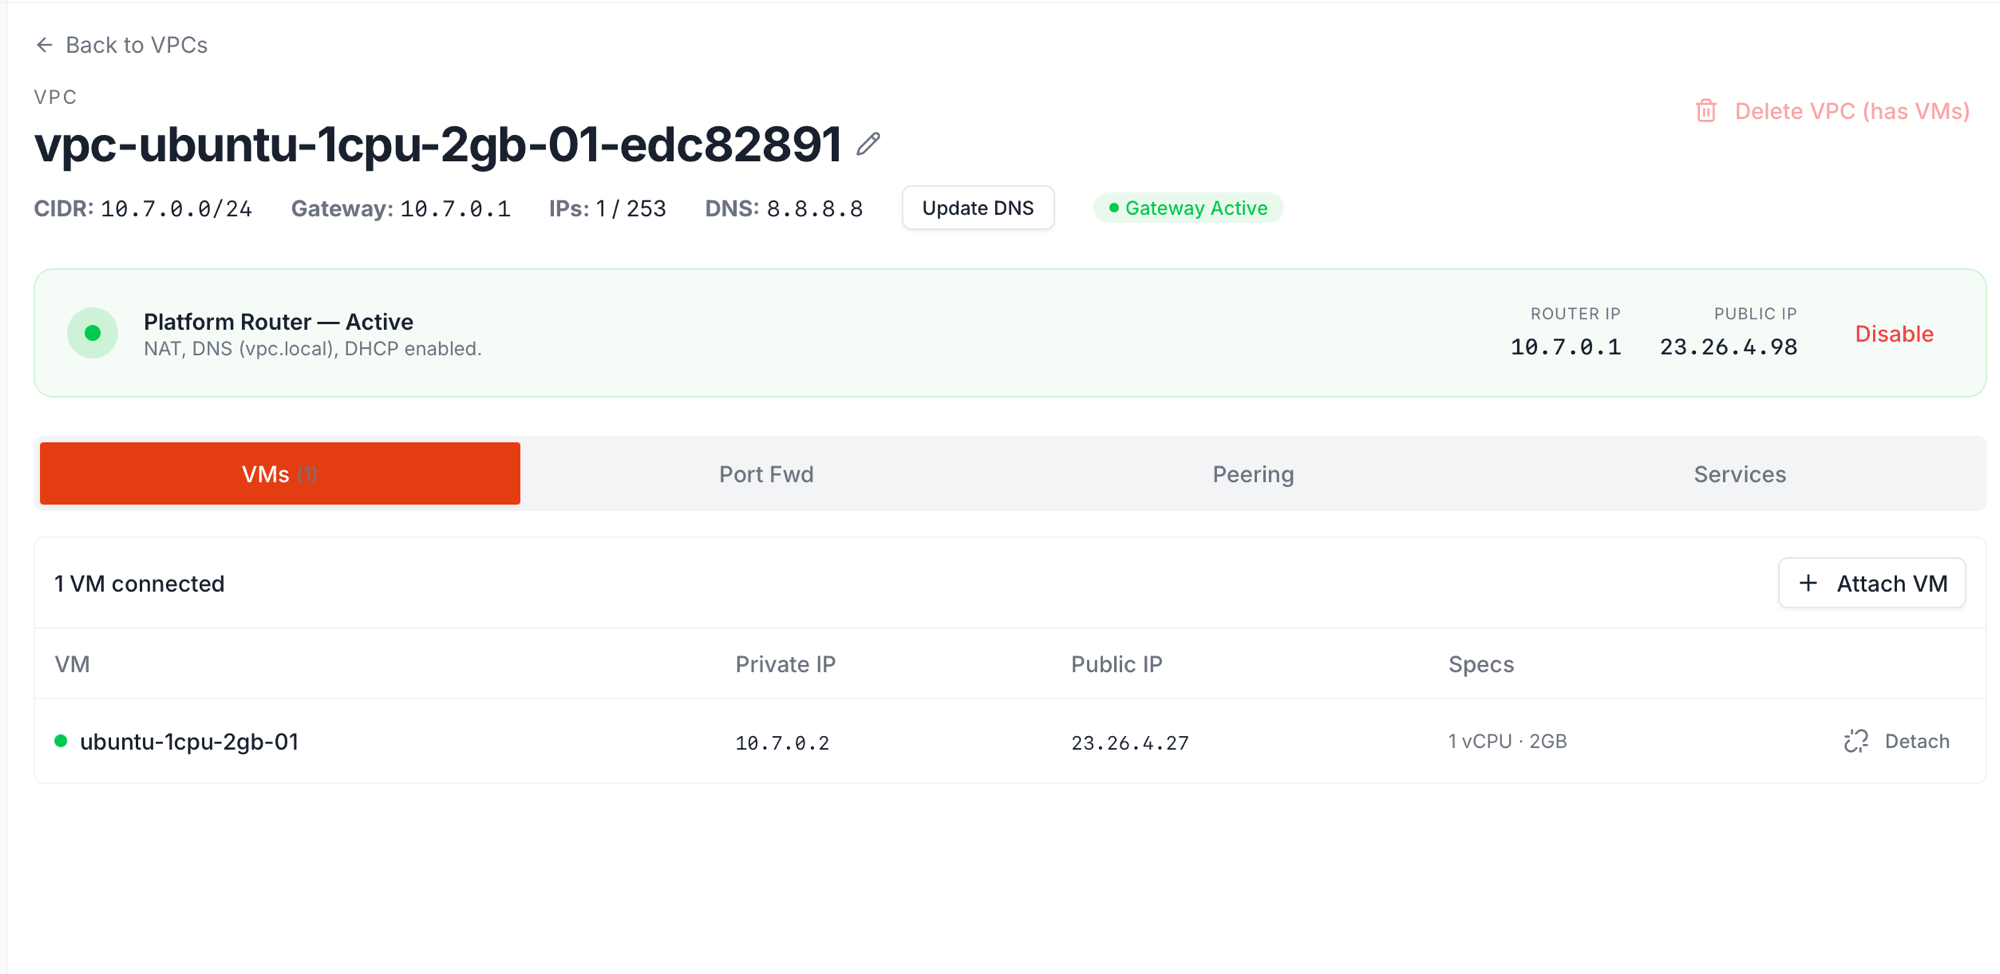 Once active, the gateway card shows:
| Field | What it means |
| ---------------------------------------- | ----------------------------------------------------------------------------------------------------------------------------------------------------------- |
| **Platform Router — Active** | The gateway is up and routing |
| **NAT, DNS (`vpc.local`), DHCP enabled** | The three managed services it provides: outbound NAT, an internal DNS suffix `vpc.local` for VM-to-VM name resolution, and DHCP for automatic IP assignment |
| **ROUTER IP** | The gateway's address inside the VPC — always `.1` (e.g. `10.7.0.1`). VMs use this as their default gateway |
| **PUBLIC IP** | The single public IPv4 the gateway uses to NAT outbound traffic. This is also the address you target in port-forwarding rules |
| **Disable** | Tears down the router VM and removes its public IP. The VPC drops back to "No Internet Gateway" |
There is nothing to SSH into and nothing to maintain — Raff handles patching, HA, and lifecycle. The router's public IP is reserved while the gateway is enabled and returns to your account when you disable it.
### Firewall Appliance (\$4.99 or \$9.99 / month)
Click **Deploy** on the Firewall Appliance card. The Deploy dialog opens with everything you need to bootstrap OPNsense in one form.
Once active, the gateway card shows:
| Field | What it means |
| ---------------------------------------- | ----------------------------------------------------------------------------------------------------------------------------------------------------------- |
| **Platform Router — Active** | The gateway is up and routing |
| **NAT, DNS (`vpc.local`), DHCP enabled** | The three managed services it provides: outbound NAT, an internal DNS suffix `vpc.local` for VM-to-VM name resolution, and DHCP for automatic IP assignment |
| **ROUTER IP** | The gateway's address inside the VPC — always `.1` (e.g. `10.7.0.1`). VMs use this as their default gateway |
| **PUBLIC IP** | The single public IPv4 the gateway uses to NAT outbound traffic. This is also the address you target in port-forwarding rules |
| **Disable** | Tears down the router VM and removes its public IP. The VPC drops back to "No Internet Gateway" |
There is nothing to SSH into and nothing to maintain — Raff handles patching, HA, and lifecycle. The router's public IP is reserved while the gateway is enabled and returns to your account when you disable it.
### Firewall Appliance (\$4.99 or \$9.99 / month)
Click **Deploy** on the Firewall Appliance card. The Deploy dialog opens with everything you need to bootstrap OPNsense in one form.
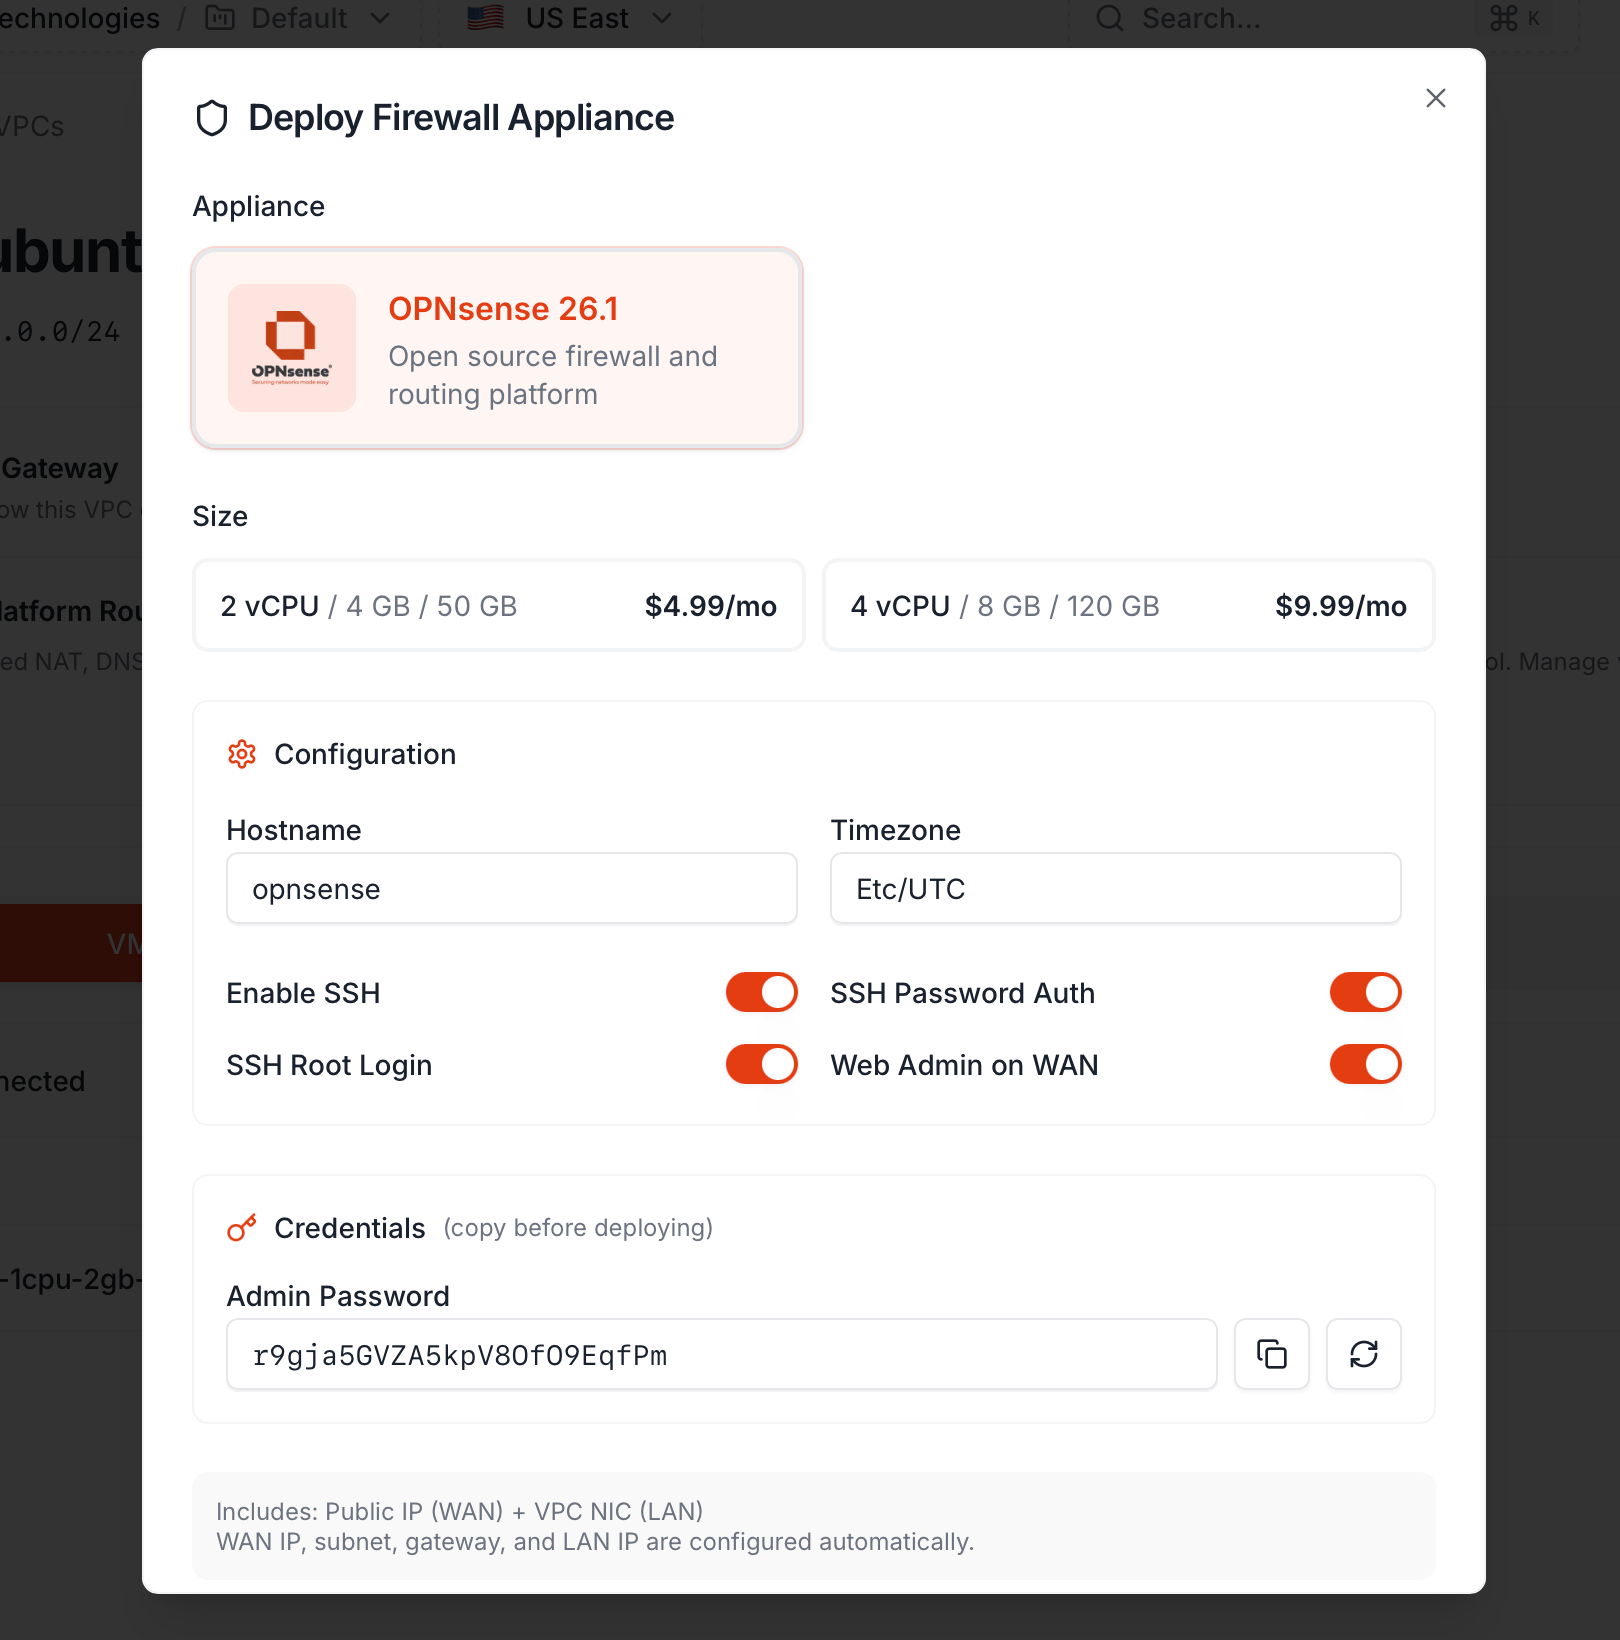 **Pick a size:**
| Size | Specs | Price |
| --------- | ------------------------------- | ------------------ |
| **Small** | 2 vCPU / 4 GB RAM / 50 GB disk | **\$4.99 / month** |
| **Large** | 4 vCPU / 8 GB RAM / 120 GB disk | **\$9.99 / month** |
The small plan handles a few hundred concurrent connections and a couple of VPN tunnels comfortably. Step up to large for IDS/IPS rules, larger fleets, or many VPN clients. The plan bills like any other VM — accrues continuously, settled month-end on the 1st against your account balance — and unused days are credited back if you delete the gateway mid-cycle.
**Configuration:**
| Field | Default | What it does |
| --------------------- | ---------- | -------------------------------------------------------------------------------------------------------------------- |
| **Hostname** | `opnsense` | The OS hostname inside the appliance |
| **Timezone** | `Etc/UTC` | OS timezone — set to your operations timezone if you read logs in local time |
| **Enable SSH** | On | Whether SSH is enabled at all on the appliance |
| **SSH Password Auth** | On | Allow password-based SSH (turn off if you'll only use SSH keys) |
| **SSH Root Login** | On | Allow `root` to SSH directly (commonly tightened down post-deploy) |
| **Web Admin on WAN** | On | Whether OPNsense's web UI is exposed on the public WAN IP. Turn off if you'll administer it from inside the VPC only |
You can change all of these inside OPNsense after deploy — these toggles just set the *initial* config so you can reach the appliance in the first place.
**Credentials — copy the admin password BEFORE deploying:**
The dialog auto-generates a 24-character admin password. **Copy it now.** The dashboard stores it for display, but the convention is to grab it before clicking Deploy. The regenerate button (the circular arrow) creates a new one if you want.
This password is the `root` password for the OPNsense web UI and SSH. Treat it like any other production credential — paste it into your secrets manager.
**What "Includes: Public IP (WAN) + VPC NIC (LAN)" means:**
The dialog footer notes: *Includes: Public IP (WAN) + VPC NIC (LAN). WAN IP, subnet, gateway, and LAN IP are configured automatically.*
Translation:
* The appliance gets **two NICs** — `vtnet0` is WAN with a public IPv4, `vtnet1` is LAN sitting at `.1` of your VPC
* The WAN settings (public IP, subnet mask, default gateway) and LAN settings (VPC IP, subnet) are pre-baked into the OPNsense config — you don't manually configure them
* VMs in the VPC use the LAN IP as their default gateway, just like with the Platform Router
**After deploy:** the appliance VM appears in your Compute list with a 🛡 firewall badge. Open the OPNsense web UI at `https://` (or via VNC console if you turned Web Admin on WAN off), log in as `root` / your saved admin password, and configure rules. From there it's vanilla OPNsense — every guide and book about OPNsense applies.
### Switching gateway types
Both types are mutually exclusive. To switch:
1. Click **Disable** on the active gateway card
2. The gateway VM is torn down, its public IP returned to your account
3. The card re-renders to show both options again
4. Pick the other and Enable / Deploy
There's a brief outage for VPC outbound traffic during the switch — typically under a minute for Platform Router, a couple of minutes for Firewall Appliance. Existing VM-to-VM private traffic inside the VPC is **not** affected.
## VMs tab — attach and detach
The **VMs** tab lists every VM attached to the VPC with its private IP, public IP (if any), and specs. Each row has a **Detach** action.
* **+ Attach VM** — pick an existing VM in the same region and add it to this VPC
* **Detach** — remove the VM's interface in this VPC. The VM keeps running on its other interfaces; if this was its only interface, the detach is blocked
For the full attach flow, see [Attach a VM](/products/network/vpc/quickstart-guides/attach-vm).
## Port Fwd tab — public-port forwarding
Available only after you've enabled the **Platform Router** gateway (the Firewall Appliance has its own NAT/port-forwarding inside OPNsense). Lets you forward traffic arriving on the router's public IP to specific private VMs.
**Pick a size:**
| Size | Specs | Price |
| --------- | ------------------------------- | ------------------ |
| **Small** | 2 vCPU / 4 GB RAM / 50 GB disk | **\$4.99 / month** |
| **Large** | 4 vCPU / 8 GB RAM / 120 GB disk | **\$9.99 / month** |
The small plan handles a few hundred concurrent connections and a couple of VPN tunnels comfortably. Step up to large for IDS/IPS rules, larger fleets, or many VPN clients. The plan bills like any other VM — accrues continuously, settled month-end on the 1st against your account balance — and unused days are credited back if you delete the gateway mid-cycle.
**Configuration:**
| Field | Default | What it does |
| --------------------- | ---------- | -------------------------------------------------------------------------------------------------------------------- |
| **Hostname** | `opnsense` | The OS hostname inside the appliance |
| **Timezone** | `Etc/UTC` | OS timezone — set to your operations timezone if you read logs in local time |
| **Enable SSH** | On | Whether SSH is enabled at all on the appliance |
| **SSH Password Auth** | On | Allow password-based SSH (turn off if you'll only use SSH keys) |
| **SSH Root Login** | On | Allow `root` to SSH directly (commonly tightened down post-deploy) |
| **Web Admin on WAN** | On | Whether OPNsense's web UI is exposed on the public WAN IP. Turn off if you'll administer it from inside the VPC only |
You can change all of these inside OPNsense after deploy — these toggles just set the *initial* config so you can reach the appliance in the first place.
**Credentials — copy the admin password BEFORE deploying:**
The dialog auto-generates a 24-character admin password. **Copy it now.** The dashboard stores it for display, but the convention is to grab it before clicking Deploy. The regenerate button (the circular arrow) creates a new one if you want.
This password is the `root` password for the OPNsense web UI and SSH. Treat it like any other production credential — paste it into your secrets manager.
**What "Includes: Public IP (WAN) + VPC NIC (LAN)" means:**
The dialog footer notes: *Includes: Public IP (WAN) + VPC NIC (LAN). WAN IP, subnet, gateway, and LAN IP are configured automatically.*
Translation:
* The appliance gets **two NICs** — `vtnet0` is WAN with a public IPv4, `vtnet1` is LAN sitting at `.1` of your VPC
* The WAN settings (public IP, subnet mask, default gateway) and LAN settings (VPC IP, subnet) are pre-baked into the OPNsense config — you don't manually configure them
* VMs in the VPC use the LAN IP as their default gateway, just like with the Platform Router
**After deploy:** the appliance VM appears in your Compute list with a 🛡 firewall badge. Open the OPNsense web UI at `https://` (or via VNC console if you turned Web Admin on WAN off), log in as `root` / your saved admin password, and configure rules. From there it's vanilla OPNsense — every guide and book about OPNsense applies.
### Switching gateway types
Both types are mutually exclusive. To switch:
1. Click **Disable** on the active gateway card
2. The gateway VM is torn down, its public IP returned to your account
3. The card re-renders to show both options again
4. Pick the other and Enable / Deploy
There's a brief outage for VPC outbound traffic during the switch — typically under a minute for Platform Router, a couple of minutes for Firewall Appliance. Existing VM-to-VM private traffic inside the VPC is **not** affected.
## VMs tab — attach and detach
The **VMs** tab lists every VM attached to the VPC with its private IP, public IP (if any), and specs. Each row has a **Detach** action.
* **+ Attach VM** — pick an existing VM in the same region and add it to this VPC
* **Detach** — remove the VM's interface in this VPC. The VM keeps running on its other interfaces; if this was its only interface, the detach is blocked
For the full attach flow, see [Attach a VM](/products/network/vpc/quickstart-guides/attach-vm).
## Port Fwd tab — public-port forwarding
Available only after you've enabled the **Platform Router** gateway (the Firewall Appliance has its own NAT/port-forwarding inside OPNsense). Lets you forward traffic arriving on the router's public IP to specific private VMs.
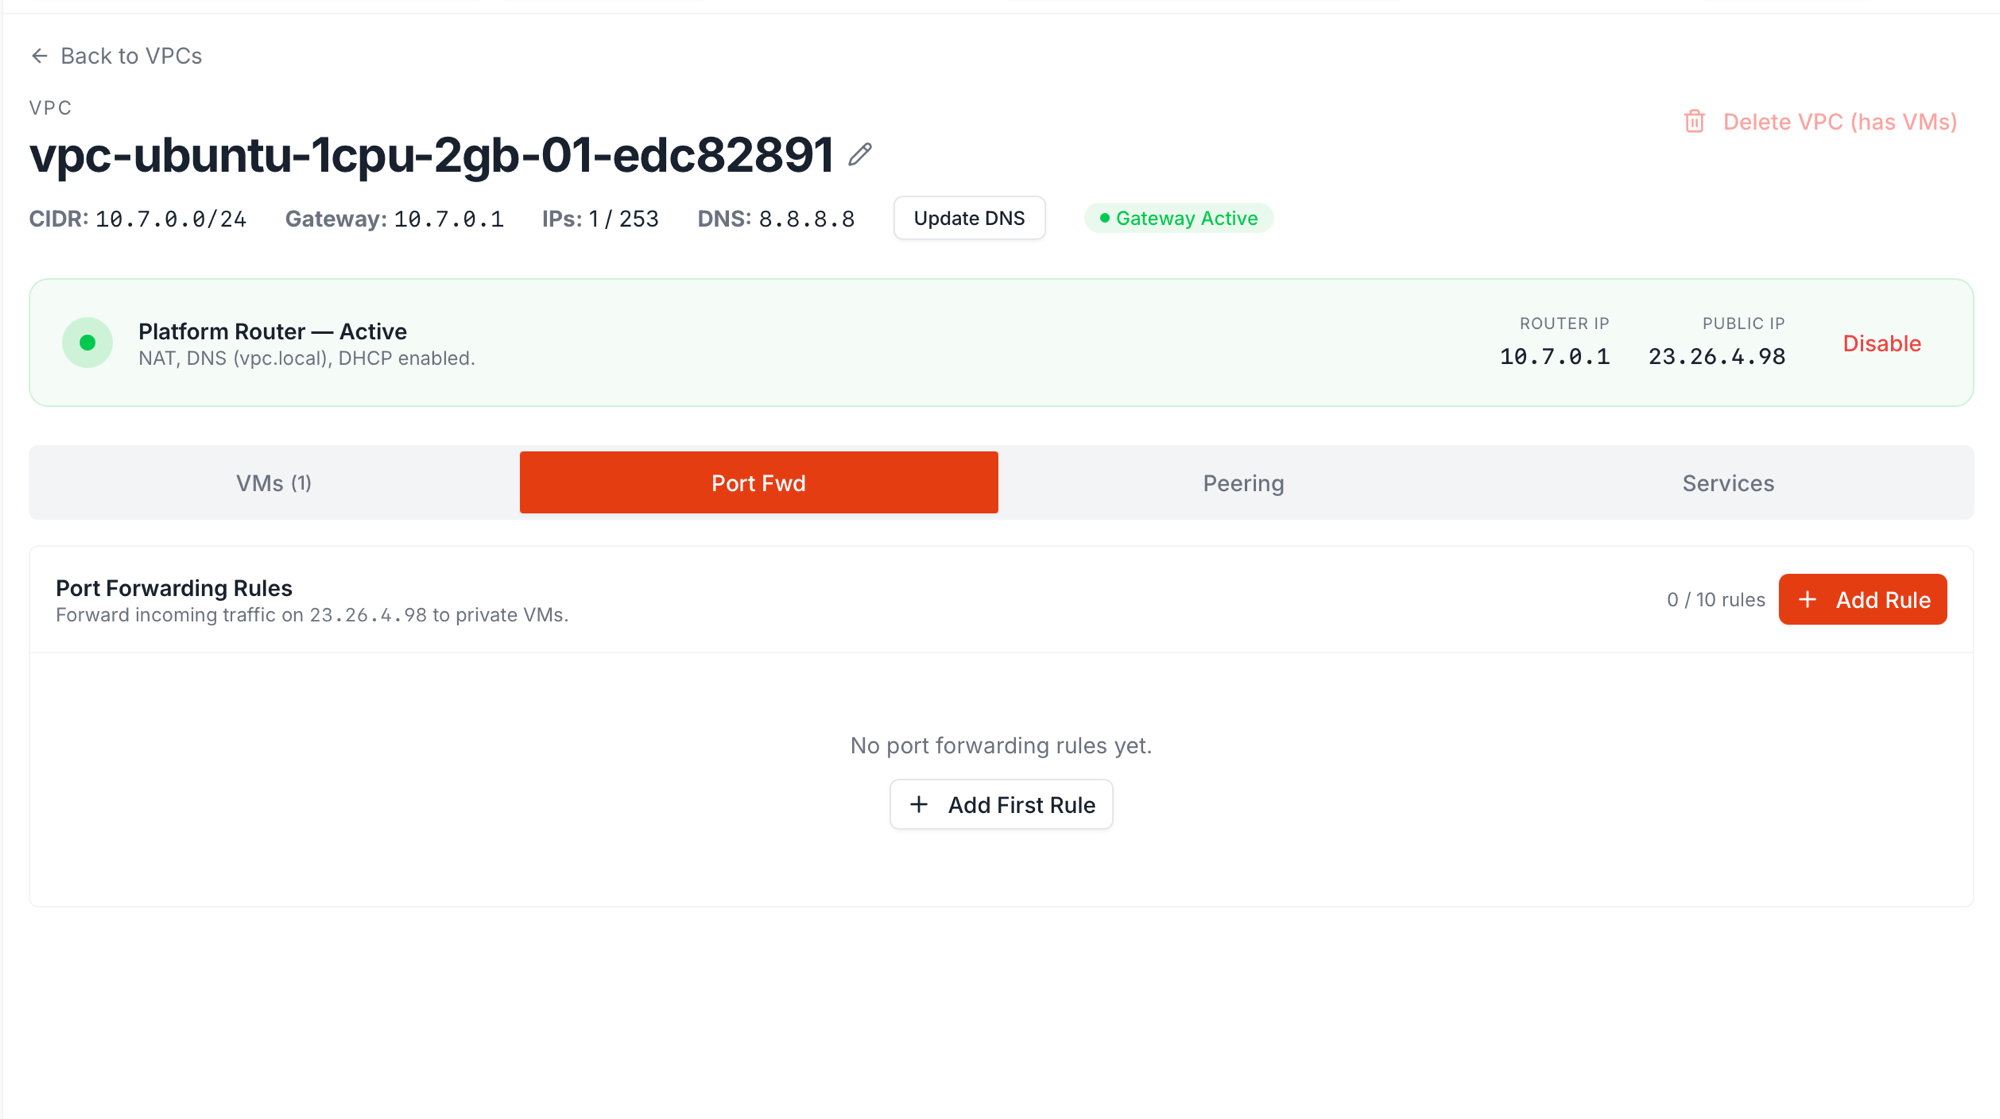 The header explicitly states the destination IP — *"Forward incoming traffic on `23.26.4.98` to private VMs"* — so you always know which public IP your rules ride on. That's the same `PUBLIC IP` shown on the gateway card.
| Field | Example | Notes |
| ---------------- | -------------- | ------------------------------------------------------------------------------------------------ |
| **Public port** | `2222`, `8080` | The port on the router's public IP. Avoid ports the router uses for its own services (DHCP, DNS) |
| **Private IP** | `10.7.0.5` | The VPC-internal IP of the destination VM. Must be in the VPC's range and currently in use |
| **Private port** | `22`, `80` | The port on the destination VM where the service is actually listening |
| **Protocol** | TCP / UDP | Most use cases are TCP |
Up to **10 rules per VPC** — the counter reads `0 / 10 rules` when empty. Add with **+ Add Rule** (or **+ Add First Rule** in the empty state), delete with the trash icon on each row. Rules apply within a few seconds.
**Common patterns:**
| Goal | Rule |
| -------------------------------------- | --------------------------------------------------- |
| SSH to a private VM through the router | `2222 → 10.7.0.5:22` (TCP) |
| Web service through the router | `80 → 10.7.0.10:80` and `443 → 10.7.0.10:443` (TCP) |
| Game server | `27015 → 10.7.0.20:27015` (UDP) |
If you need more than 10 rules, complex NAT, or rule-level inspection, deploy the **Firewall Appliance** instead — OPNsense supports unlimited rules with full match-on-anything semantics.
## Peering tab — coming soon
The dashboard shows a Peering tab on every VPC, but it's a placeholder today. When VPC peering ships, you'll be able to connect two VPCs so VMs on one can reach VMs on the other over their private subnets. Until then, route cross-VPC traffic through public IPs or a shared gateway VM.
## Services tab — coming soon
Reserved for **Load Balancer** and **VPN Gateway** as managed services attached to a VPC. Also placeholder today. The Firewall Appliance handles the VPN case in the meantime.
## Delete the VPC
The red **Delete VPC** action is on the top-right of the detail page (and as the bottom item in the row menu). It's disabled while any VM is attached — the dashboard shows `Delete (has VMs)` as a hint. To delete:
1. Detach every VM from the VMs tab (or delete them entirely)
2. Click **Delete VPC**, confirm
For the full flow including which other things might be holding onto the VPC, see [Delete a VPC](/products/network/vpc/quickstart-guides/delete-vpc).
## Related
Set up a new VPC.
Add a VM to this VPC.
Remove an empty VPC.
The header explicitly states the destination IP — *"Forward incoming traffic on `23.26.4.98` to private VMs"* — so you always know which public IP your rules ride on. That's the same `PUBLIC IP` shown on the gateway card.
| Field | Example | Notes |
| ---------------- | -------------- | ------------------------------------------------------------------------------------------------ |
| **Public port** | `2222`, `8080` | The port on the router's public IP. Avoid ports the router uses for its own services (DHCP, DNS) |
| **Private IP** | `10.7.0.5` | The VPC-internal IP of the destination VM. Must be in the VPC's range and currently in use |
| **Private port** | `22`, `80` | The port on the destination VM where the service is actually listening |
| **Protocol** | TCP / UDP | Most use cases are TCP |
Up to **10 rules per VPC** — the counter reads `0 / 10 rules` when empty. Add with **+ Add Rule** (or **+ Add First Rule** in the empty state), delete with the trash icon on each row. Rules apply within a few seconds.
**Common patterns:**
| Goal | Rule |
| -------------------------------------- | --------------------------------------------------- |
| SSH to a private VM through the router | `2222 → 10.7.0.5:22` (TCP) |
| Web service through the router | `80 → 10.7.0.10:80` and `443 → 10.7.0.10:443` (TCP) |
| Game server | `27015 → 10.7.0.20:27015` (UDP) |
If you need more than 10 rules, complex NAT, or rule-level inspection, deploy the **Firewall Appliance** instead — OPNsense supports unlimited rules with full match-on-anything semantics.
## Peering tab — coming soon
The dashboard shows a Peering tab on every VPC, but it's a placeholder today. When VPC peering ships, you'll be able to connect two VPCs so VMs on one can reach VMs on the other over their private subnets. Until then, route cross-VPC traffic through public IPs or a shared gateway VM.
## Services tab — coming soon
Reserved for **Load Balancer** and **VPN Gateway** as managed services attached to a VPC. Also placeholder today. The Firewall Appliance handles the VPN case in the meantime.
## Delete the VPC
The red **Delete VPC** action is on the top-right of the detail page (and as the bottom item in the row menu). It's disabled while any VM is attached — the dashboard shows `Delete (has VMs)` as a hint. To delete:
1. Detach every VM from the VMs tab (or delete them entirely)
2. Click **Delete VPC**, confirm
For the full flow including which other things might be holding onto the VPC, see [Delete a VPC](/products/network/vpc/quickstart-guides/delete-vpc).
## Related
Set up a new VPC.
Add a VM to this VPC.
Remove an empty VPC.